•Process where customers mail payments to a post office box near
your remittance bank and the bank deposits the payments in your
account at regular intervals.
•Bank provides you with computer files detailing about the receipts
and their application. •Receivables uses Auto Lockbox to import
details about receipts directly into the system.
What is AutoLockbox:
Auto Lockbox is a service that commercial banks offer corporate
customers to enable them to outsource their accounts receivable
payment processing. Auto Lockbox eliminates manual data entry
by automatically processing receipts that are sent directly to
your bank.
Benefits of AutoLockbox:
•Eliminates manual data entry.
•Streamlines the application of receipts to outstanding transactions.
•Effectively manages cash flow by reducing turnover for converting
•Streamlines the application of receipts to outstanding transactions.
•Effectively manages cash flow by reducing turnover for converting
checks into cash.
•Apply receipts to outstanding invoices
•Import historical receipt data
•Autolockbox reports, such as the Post Quikcash Execution Report,
•Apply receipts to outstanding invoices
•Import historical receipt data
•Autolockbox reports, such as the Post Quikcash Execution Report,
are a good tool to reconcile autolockbox receipts with the bank
transmission reports.

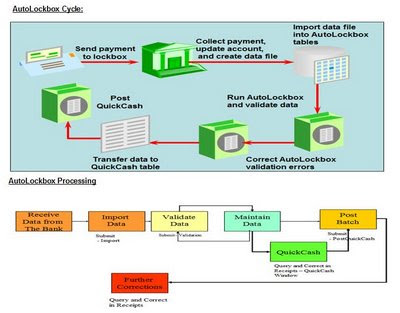
AutoLockbox is 3 Step Process:
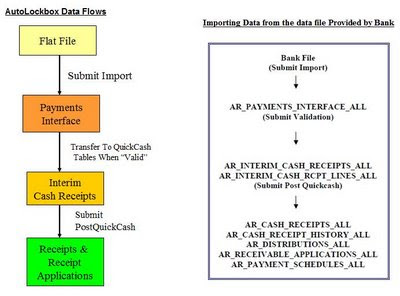
1. Import :During this step, Lockbox reads and formats the data from
your bank file into interface table AR_PAYMENTS_INTERFACE_ALL
using a SQL *Loader.
•Data is imported into interface tables •Imported data does not affect accounts receivables balances
•Import automatically generates the Lockbox Execution Import report
•Use report to check the imported data
2.Validation: The validation program checks data in this
interface table for compatibility with Receivables. Once validated,
the data is transferred into QuickCash tables
(AR_INTERIM_CASH_RECEIPTS_ALL and
AR_INTERIM_CASH_RCPT_LINES_ALL) .
AR_INTERIM_CASH_RCPT_LINES_ALL) .
At this point, you can optionally query your receipts in the QuickCash
window and change how they will be applied before submitting the
final step, Post QuickCash script.
•Ensures that each receipt complies with application and customer
requirements
•Customer must have a primary billing location
•Bank can provide a MICR or a customer number to identify customer
•Validated data is transferred to QuickCash tables
•Transfer does not affect accounts receivables amounts
•Receivables can use AutoAssociate or a billing address to identify customer
•Use the Lockbox Execution Import report to review the validation
3.Post QuickCash: This step applies the receipts and updates your
customer’s balances.
•Data is transferred from QuickCash tables to Receivables tables
•Posting updates the account balances to reflect the imported receipts
•View and update receipts in the Receipts window
•Posting updates the account balances to reflect the imported receipts
•View and update receipts in the Receipts window

These steps can be submitted individually or at the same time from the submit Lockbox Processing window. After you run Post QuickCash, Receivables treats the receipts like any other receipts, you can reverse and reapply them and apply any unapplied, unidentified, or on-account
amounts.
MICR Number:
What is a MICR Number:
–Magnetic Ink Character Recognition (MICR)
–Magnetic Ink Character Recognition (MICR)
MICR # Consists of two segments
1st segment - Transit Routing Number (Customer’s Bank) this
1st segment - Transit Routing Number (Customer’s Bank) this
identifies the bank from which your customer draws their check.
2nd Segment - Bank Account of the customer (Customer’s Account)
MICR Number Can Only Be Used For One Customer Only!
MICR Number is used to identify the Customer.
2nd Segment - Bank Account of the customer (Customer’s Account)
MICR Number Can Only Be Used For One Customer Only!
MICR Number is used to identify the Customer.
The bank account number and the transit routing number makeup
your customer’s MICR number. If a MICR number is shared with
more than one customer, the receipt is rejected.Customers that are
associated must have unique MICR numbers.
By default the lockbox validation program uses an invoice or debit
memo number to determine the customer.
How AutoLockbox Identifies Customers for Receipts:
AutoLockbox can validate your customer data based on the
following attributes . If no match is found, the receipt is imported
as Unidentified receipt. This unidentified receipts can be identified
and then applied from the Quick cash window or the receipt window.
1. Customer Number: If you provide a customer number for
receipts that you import through AutoLockbox, Receivables can
identify the customer to which the receipt belongs .
2. MICR Number: The MICR number that appears on each
receipt relates the customer to a bank. Lockbox only uses MICR
numbers to associate a customer with a receipt if both of the
following are true:
a). The customer number is not included in the transmission
a). The customer number is not included in the transmission
format
b). The MICR number is passed
b). The MICR number is passed
3. AutoAssociate: If the customer cannot be identified from either
the MICR number or the customer number (for example, if the
transmission does not include this information), you can use
AutoAssociate to determine the customer using matching numbers.
A matching number can be a transaction number, consolidated
billing invoice number, sales order number, purchase order number
or another custom defined number.
4. Associate Receipts with Billing Locations: Receivables also lets
you track receipts for each of your customer’s billing locations.
To use this feature, you must include a billing location in your
transmission format, data file and the flag Require Billing Location
should be set to Yes. This option should be set to yes both at system
options and at the setup of Lockbox. If the box is checked at the
Lockbox, the receipt will be validated only if the billing location is
provided. The setting at the system options level determines
whether Post QuickCash can process receipts with /without billing
locations.
How AutoLockbox Applies Receipts:
If Lockbox is able to identify the customer for a receipt and the
transaction number is provided , Lockbox applies the receipt to this
transaction.
If the transaction number is not provided and Auto associate is
set to Yes, Post QuickCash uses the matching rules defined for the
customer site, customer or Lockbox to apply the receipt.
The setting of Match Receipts By Option tells what type of matching
number is passed in the transmission. If Matching Rules fail, Post
QuickCash applies the receipt using the AutoCash rules set .
If AutoCash rules also fail, Lockbox assigns the receipt a status
of Unapplied. If the transaction number is not provided and Auto
associate is set to No, Post QuickCash assigns the receipt a status
of Unapplied.
AutoLockbox Receipts Matching:
Receivables applies the receipt using:
•Transaction number
•Sales order number
•Purchase order number
•Consolidated bill number
•User-defined number
•Transaction number
•Sales order number
•Purchase order number
•Consolidated bill number
•User-defined number
Maintain Transmission Data:
Use the Lockbox Transmission Data window to delete and edit
transmission data imported into Receivables from your bank
using Lockbox.
You can correct your lockbox data in this window for receipts that fail
validation, then resubmit the validation step again .
Running AutoLockbox:

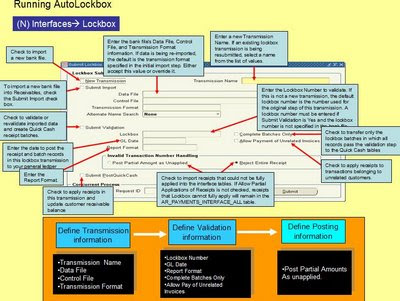
To Import and apply receipts using AutoLockbox, run each step individually or run them as a group.
Import:
a) If you are importing a new bank file, check the New Transmission check box, then enter a new Transmission Name.
a) If you are importing a new bank file, check the New Transmission check box, then enter a new Transmission Name.
b) If you are resubmitting an existing lockbox transmission, you can select a name from the list of values.
c) Enter the name of the datafile along with path and extension.
d) Enter the name of the control file with out extension. Make sure that
c) Enter the name of the datafile along with path and extension.
d) Enter the name of the control file with out extension. Make sure that
the control file in $AR_TOP/bin directory.
e) Select the transmission Format from list of values.
e) Select the transmission Format from list of values.
Validation:
a) Check the Submit Validation Check box.
b) You must enter a lockbox number if Submit Validation is Yes and
the lockbox number is not specified in your bank file.
c) To apply receipts to transactions belonging to unrelated customers,
c) To apply receipts to transactions belonging to unrelated customers,
check the Allow Payment of Unrelated Invoices check box.
d) If you defined your GL Date as ’Constant Date’ in the Lockboxes
window, you must enter a GL Date; if you specified a GL Date of
’Deposit Date’ or ’Import Date’, Receivables uses this as the GL date.
e) Enter a Report Format. Enter ’All’ to include all records processed
e) Enter a Report Format. Enter ’All’ to include all records processed
in this transmission. Enter ’Rejects Only’ to include only records
that failed validation.
f) To transfer only the lockbox batches in which all records pass the
f) To transfer only the lockbox batches in which all records pass the
validation step to the QuickCash tables, check the Complete Batches
Only check box. If you do not check this check box, Receivables will
transfer any receipts within a batch that pass validation, even if
others are rejected.
Post Quick Cash:
a) To apply the receipts and update your Customer’s balances, check
Submit post QuickCash check box.
b)Choose how lockbox should handle invalid transaction numbers.
c) Post Partial Amounts as Unapplied or Reject Entire Receipt
b)Choose how lockbox should handle invalid transaction numbers.
c) Post Partial Amounts as Unapplied or Reject Entire Receipt
Save your work. Receivables displays the Request ID of your
concurrent process and generates the Lockbox Execution report.
No comments:
Post a Comment