Ledger Architecture
- Ledgers: Define by Chart of Accounts, Calendars, Currency and Accounting Conventions.
- Ledger Sets: Group of Ledgers sharing the Same Chart of Accounts and Currency.
Centralized and Flexible Rules based Accounting Engine
- Ruled based engine with configurable accounting rules
- Single source of truth for accounting, reconciliation and reporting with common data model and repository and posting engine.
- Consistent data model and user interface across all subledgers.
Centralized Legal Entity Management
- Manage Legal Corporate Structure
- Link tax, intercompany, bank account and accounting functions
- Isolate legal compliance issues at legal entity from the management and security issues at operating Unit.
Centralized Banking and Payments
-Single user interface for all setup and maintenance related to banks and internal bank accounts.
-Centralized management of all funds capture and disbursements
-Centralized credit card management.
Centralized Global Tax Processing
-Centralized Tax Engine with single data model for rules and transations across geographes and applications
-Centralized tax repository for global visibility
-Simplified tax configuration across legal entities and oracle apps.
Advanced Global Intercompany system
- Centralized intercompany and intracompany accounts setup
- Fully configurable approval rules and invoicing options.
- Physical Payables and Receivables intercompany invoice generation.
Oracle General Ledger:
- Single Page for all accounting setup with Accounting Setup Manager.
- Prevent Accounting errors with Alternate accounts
-Replacement for Disabled Accounts
-Prevent unauthrized posting with Control Accounts
-Simplify security and Data Access and Definition Access sets.
-Sequential numbering of accounting entries
-Journal line reconciliation-Journal Batch Copy
-Historical Data initialization for new reporting currencies and secondary ledgers.
Oracle Payables:
- Pay on behalf of a different party with 3rd party payments
- Greater flexibility in defining and calculating discounts for quick payments.
-Application of withholding taxes at time of invoice validation and during payment
-Improved resolution for dispute processing with suppliers.
-Imporve invoice data entry and management with line level entry, approval, matching and tax calculation.
-Automated netting of Customer and Supplier balance
-Self-Service invoivce allows employees and suppliers to enter various invoice type online.
-New interface and data model for supplier managment in TCA.
Oracle Receivables:
-Streamlined receipt porcessing with cash application work queue.
-Enhanced performance for high volume receivables processing.
-Synchronize Cost of Goods Sold(COGS) with Revenue.
-Increased efficiency with line level cash application.
-Improved billing communcation with balance forward billing.
-Create standard late charge polices that can be assigned to customer accounts or account sites.
Oracle Advanced Collections:
- Assign bankruptcy status at the customer level
- Effetively manage later stage delinquency status assignment at case and contract level.
- Internal only comment visibility for dispute processing.
- Streamline system setup and operational maintenance with implementation checklist.
-Consolidation of collections features provides collections workbench
-Improved ability to collect with enhanced dispute management.
Oracle Assets:
- Flexible accounting configuration
- Automated depreciation rollback for selected assets
- Enhanced mass additions interface for legacy conversions
- Unplanned depreciation(impairments) for energy industry
- Unit of production and straight line depreciation methods for O&G industry.
- Flexible reporting with BI Publisher.
Source: My Oracle support
Showing posts with label AR. Show all posts
Showing posts with label AR. Show all posts
Tuesday, December 22, 2009

Saturday, May 30, 2009
AutoLockbox:
Overview of AutoLockbox:
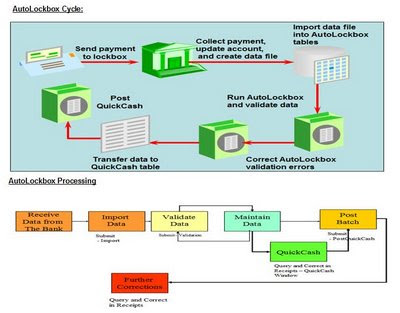
•Data is imported into interface tables •Imported data does not affect accounts receivables balances
•Import automatically generates the Lockbox Execution Import report
•Use report to check the imported data
AutoLockbox can validate your customer data based on the
1. Customer Number: If you provide a customer number for
a) Check the Submit Validation Check box.
b) You must enter a lockbox number if Submit Validation is Yes and
Post Quick Cash:
a) To apply the receipts and update your Customer’s balances, check
•Process where customers mail payments to a post office box near
your remittance bank and the bank deposits the payments in your
account at regular intervals.
•Bank provides you with computer files detailing about the receipts
and their application. •Receivables uses Auto Lockbox to import
details about receipts directly into the system.
What is AutoLockbox:
Auto Lockbox is a service that commercial banks offer corporate
customers to enable them to outsource their accounts receivable
payment processing. Auto Lockbox eliminates manual data entry
by automatically processing receipts that are sent directly to
your bank.
Benefits of AutoLockbox:
•Eliminates manual data entry.
•Streamlines the application of receipts to outstanding transactions.
•Effectively manages cash flow by reducing turnover for converting
•Streamlines the application of receipts to outstanding transactions.
•Effectively manages cash flow by reducing turnover for converting
checks into cash.
•Apply receipts to outstanding invoices
•Import historical receipt data
•Autolockbox reports, such as the Post Quikcash Execution Report,
•Apply receipts to outstanding invoices
•Import historical receipt data
•Autolockbox reports, such as the Post Quikcash Execution Report,
are a good tool to reconcile autolockbox receipts with the bank
transmission reports.

AutoLockbox is 3 Step Process:
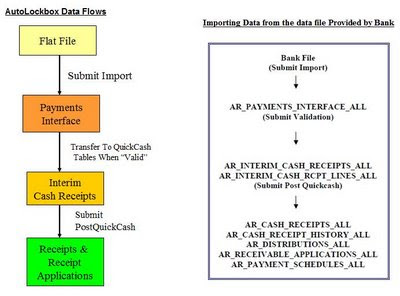
1. Import :During this step, Lockbox reads and formats the data from
your bank file into interface table AR_PAYMENTS_INTERFACE_ALL
using a SQL *Loader.
•Data is imported into interface tables •Imported data does not affect accounts receivables balances
•Import automatically generates the Lockbox Execution Import report
•Use report to check the imported data
2.Validation: The validation program checks data in this
interface table for compatibility with Receivables. Once validated,
the data is transferred into QuickCash tables
(AR_INTERIM_CASH_RECEIPTS_ALL and
AR_INTERIM_CASH_RCPT_LINES_ALL) .
AR_INTERIM_CASH_RCPT_LINES_ALL) .
At this point, you can optionally query your receipts in the QuickCash
window and change how they will be applied before submitting the
final step, Post QuickCash script.
•Ensures that each receipt complies with application and customer
requirements
•Customer must have a primary billing location
•Bank can provide a MICR or a customer number to identify customer
•Validated data is transferred to QuickCash tables
•Transfer does not affect accounts receivables amounts
•Receivables can use AutoAssociate or a billing address to identify customer
•Use the Lockbox Execution Import report to review the validation
•Customer must have a primary billing location
•Bank can provide a MICR or a customer number to identify customer
•Validated data is transferred to QuickCash tables
•Transfer does not affect accounts receivables amounts
•Receivables can use AutoAssociate or a billing address to identify customer
•Use the Lockbox Execution Import report to review the validation
3.Post QuickCash: This step applies the receipts and updates your
customer’s balances.
•Data is transferred from QuickCash tables to Receivables tables
•Posting updates the account balances to reflect the imported receipts
•View and update receipts in the Receipts window
•Posting updates the account balances to reflect the imported receipts
•View and update receipts in the Receipts window

These steps can be submitted individually or at the same time from the submit Lockbox Processing window. After you run Post QuickCash, Receivables treats the receipts like any other receipts, you can reverse and reapply them and apply any unapplied, unidentified, or on-account
amounts.
MICR Number:
What is a MICR Number:
–Magnetic Ink Character Recognition (MICR)
–Magnetic Ink Character Recognition (MICR)
MICR # Consists of two segments
1st segment - Transit Routing Number (Customer’s Bank) this
1st segment - Transit Routing Number (Customer’s Bank) this
identifies the bank from which your customer draws their check.
2nd Segment - Bank Account of the customer (Customer’s Account)
MICR Number Can Only Be Used For One Customer Only!
MICR Number is used to identify the Customer.
2nd Segment - Bank Account of the customer (Customer’s Account)
MICR Number Can Only Be Used For One Customer Only!
MICR Number is used to identify the Customer.
The bank account number and the transit routing number makeup
your customer’s MICR number. If a MICR number is shared with
more than one customer, the receipt is rejected.Customers that are
associated must have unique MICR numbers.
By default the lockbox validation program uses an invoice or debit
memo number to determine the customer.
How AutoLockbox Identifies Customers for Receipts:
AutoLockbox can validate your customer data based on the
following attributes . If no match is found, the receipt is imported
as Unidentified receipt. This unidentified receipts can be identified
and then applied from the Quick cash window or the receipt window.
1. Customer Number: If you provide a customer number for
receipts that you import through AutoLockbox, Receivables can
identify the customer to which the receipt belongs .
2. MICR Number: The MICR number that appears on each
receipt relates the customer to a bank. Lockbox only uses MICR
numbers to associate a customer with a receipt if both of the
following are true:
a). The customer number is not included in the transmission
a). The customer number is not included in the transmission
format
b). The MICR number is passed
b). The MICR number is passed
3. AutoAssociate: If the customer cannot be identified from either
the MICR number or the customer number (for example, if the
transmission does not include this information), you can use
AutoAssociate to determine the customer using matching numbers.
A matching number can be a transaction number, consolidated
billing invoice number, sales order number, purchase order number
or another custom defined number.
4. Associate Receipts with Billing Locations: Receivables also lets
you track receipts for each of your customer’s billing locations.
To use this feature, you must include a billing location in your
transmission format, data file and the flag Require Billing Location
should be set to Yes. This option should be set to yes both at system
options and at the setup of Lockbox. If the box is checked at the
Lockbox, the receipt will be validated only if the billing location is
provided. The setting at the system options level determines
whether Post QuickCash can process receipts with /without billing
locations.
How AutoLockbox Applies Receipts:
If Lockbox is able to identify the customer for a receipt and the
transaction number is provided , Lockbox applies the receipt to this
transaction.
If the transaction number is not provided and Auto associate is
set to Yes, Post QuickCash uses the matching rules defined for the
customer site, customer or Lockbox to apply the receipt.
The setting of Match Receipts By Option tells what type of matching
number is passed in the transmission. If Matching Rules fail, Post
QuickCash applies the receipt using the AutoCash rules set .
If AutoCash rules also fail, Lockbox assigns the receipt a status
of Unapplied. If the transaction number is not provided and Auto
associate is set to No, Post QuickCash assigns the receipt a status
of Unapplied.
AutoLockbox Receipts Matching:
Receivables applies the receipt using:
•Transaction number
•Sales order number
•Purchase order number
•Consolidated bill number
•User-defined number
•Transaction number
•Sales order number
•Purchase order number
•Consolidated bill number
•User-defined number
Maintain Transmission Data:
Use the Lockbox Transmission Data window to delete and edit
transmission data imported into Receivables from your bank
using Lockbox.
You can correct your lockbox data in this window for receipts that fail
validation, then resubmit the validation step again .
Running AutoLockbox:

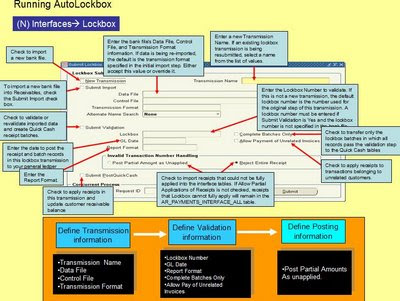
To Import and apply receipts using AutoLockbox, run each step individually or run them as a group.
Import:
a) If you are importing a new bank file, check the New Transmission check box, then enter a new Transmission Name.
a) If you are importing a new bank file, check the New Transmission check box, then enter a new Transmission Name.
b) If you are resubmitting an existing lockbox transmission, you can select a name from the list of values.
c) Enter the name of the datafile along with path and extension.
d) Enter the name of the control file with out extension. Make sure that
c) Enter the name of the datafile along with path and extension.
d) Enter the name of the control file with out extension. Make sure that
the control file in $AR_TOP/bin directory.
e) Select the transmission Format from list of values.
e) Select the transmission Format from list of values.
Validation:
a) Check the Submit Validation Check box.
b) You must enter a lockbox number if Submit Validation is Yes and
the lockbox number is not specified in your bank file.
c) To apply receipts to transactions belonging to unrelated customers,
c) To apply receipts to transactions belonging to unrelated customers,
check the Allow Payment of Unrelated Invoices check box.
d) If you defined your GL Date as ’Constant Date’ in the Lockboxes
window, you must enter a GL Date; if you specified a GL Date of
’Deposit Date’ or ’Import Date’, Receivables uses this as the GL date.
e) Enter a Report Format. Enter ’All’ to include all records processed
e) Enter a Report Format. Enter ’All’ to include all records processed
in this transmission. Enter ’Rejects Only’ to include only records
that failed validation.
f) To transfer only the lockbox batches in which all records pass the
f) To transfer only the lockbox batches in which all records pass the
validation step to the QuickCash tables, check the Complete Batches
Only check box. If you do not check this check box, Receivables will
transfer any receipts within a batch that pass validation, even if
others are rejected.
Post Quick Cash:
a) To apply the receipts and update your Customer’s balances, check
Submit post QuickCash check box.
b)Choose how lockbox should handle invalid transaction numbers.
c) Post Partial Amounts as Unapplied or Reject Entire Receipt
b)Choose how lockbox should handle invalid transaction numbers.
c) Post Partial Amounts as Unapplied or Reject Entire Receipt
Save your work. Receivables displays the Request ID of your
concurrent process and generates the Lockbox Execution report.
Saturday, May 23, 2009
VSOE and Revenue Recognition
What is Vendor specific objective evidence(VSOE)
==========================================
Vendor Specific Objective Evidence, is Fair Value for Software.
SOP 97-2 was designed for Software companies, and works fairly
well for certain traditional business models.
The concept was introduced in 1997 by the AICPA in their Statement
of Position (SOP) 97-2: It governs how any company that licenses,
sells, leases or otherwise markets software (unless it’s incidental to
the product or service as a whole) must recognize the revenue.
In particular, it governs how companies must recognize revenue from
so-called “multiple-element arrangements” – bundles of software and
related products or services sold as a unit at a single price.
Today, more and more companies find themselves dealing with
VSOE as embedded software becomes an increasingly essential
element in traditionally non-software sectors - consider cell
phones, medical devices, computer networks, even cars with GPS
services, etc.
According to SOP 97-2: you allocate relatively, splitting the fee
amongst the products and related elements based upon VSOE –
which is the price established by the vendor for the separate sale
of each element. Each VSOE price is usually established through
accumulation of a quantity of discrete sales “sufficient” to prove
that the market, in it’s willingness to pay that price, thinks the
price is fair. And here’s the big catch:
You can not recognize revenue for any element either until VSOE
exists for each and every element, or until all of the elements
have been delivered.
Sec's Statement of Postion (SOP) 97-2, Software Revenue
Recognition and SOP 98-9, Software Revenue Recognition with
respect to certain transactions, applied to all entities that license,
sell, lease or market computer software. It specifies that revenue
from an arrangement involving multiple elements should be
allocated to the various elements based on VSOE fair values to
the customer.
Sections of SOP 97-2 were amended with SOP 98-9, Software
Revenue Recognition with respect to certain transactions,
SOP 98-9 states that the residual method of revenue recognition is
required when:
1. There is vendor specfic objective evidence of the fair values of all
undelivered elements in a multiple-element arrangment that is not
accounted for using long-term contract accounting.
2. VSOE of fair value does not exist for one or more of the delivered
elements in the arrangement and 3. All Revenue recognition criteria
in SOP 97-2 other than the requirment for VSOE of the fair value of
each delivered element of the arrangement are satisfied.
Elements of VSOE:
==================
-Software Licenses
- Warranty
- Installation
- Support and professional Services
- Training
Fair Market Value (FMV):
========================
The FASB defined 'fair value' in FAS 159 as "The price that
would be received to sell an asset orpaid to transfer a liability
in an orderly transaction between market participants at the
measurement date. " The key points in this definition are
'orderly transaction' and 'market participants.' Thus fair value
can't be established by looking at an exchange of assets in a
bankruptcy or between 'related parties' as defined by the SEC.
Fair value is established by multiple, non- related market
participants in 'normal, orderly transactions. ' VSOE, on the other
hand, is fair value as established by looking at the historical
transactions of a specific vendor and does not consider what other
vendors are charging for similar products.
Revenue Recognition:
====================
Revenue recognition in today's regulatory and business
environment involves sophisticated revenue scheduling and
allocation, Vendor- specific Objective Evidence (VSOE) carve-outs
and Sarbanes-Oxley compliance. Thus having a common system
for global compliance is key to reducing complexity.
Revenue recognition is a principle prescribing that revenue is
recognized when earned.
It has two considerations - when to recognize revenue, and how
much to recognize. Revenue recognition is relevant for companies
to be able to adhere to legal compliance as per the US GAAP
requirements.
Improper revenue recognition increases the risk of financial
restatement, and financial restatements. Revenue for ISV's is
typically divided into three categories: Software, Maintenance, and
Services. Assuming that software customization is not required,
revenue can be recognized when all of the following criteria are met:
There are four basic criteria that must be met to recognize
revenue
- Evidence
- Delivery
- Fixed or determinable fee
- Collectibility.
Revenue Accounting:
===================
Use the Revenue Accounting feature to quickly and easily adjust
revenue and sales credits at the transaction or line level. You can
make manual adjustments using the Revenue Accounting and
Sales Credits window. Alternatively, use the Revenue Adjustment
API to automatically perform these adjustments. Revenue
Accounting uses the Actions Wizard to guide you through the process
of making and modifying revenue adjustments.
You can also use the wizard to record early acceptance for an
invoice line, if the line is associated with a contract that offers an
acceptance clause.
Invoicing Rules:
===============
Use Invoicing Rules to specify whether to record receivables
amounts in the first (Bill in Advance) or Last (Bill in Arrear)
Period.
Invoicing rules determine when to bill the customer in relation to
the accounting rule Periods. Accounting rules determine the
accounting periods for revenue recognition and Billing.
Two invoicing rules are available:
Bill in Advance: Use this rule to recognize receivables immediately.
Bill in Arrears: Use this rule to recognize the receivable at the end of
the revenue recognition schedule.
•Invoicing rules determine whether to recognize receivables in the first or in the last accounting period.
•Once the invoice is saved, you cannot update an invoicing rule.
•If Bill in Arrears is the invoicing rule, Oracle Receivables updates the GL Date and invoice date of the invoice to the last accounting period for the accounting rule.
Accounting Rules:
=================
Use Accounting Rules to determine when to record revenues.
Accounting Rule determine the number of periods and percentage
of total revenue to record in each accounting period.
Each invoice can have different accounting rule.
Use the Accounting, Fixed Duration type to recognize revenue evenly
over a specific number of periods. Revenue can be spread evenly or a
percentage can be specified for each period.
Variable Duration type to recognize revenue by a percentage for
the first period. The remaining revenue is spread evenly across
the number of periods you specify during transaction entry.
Accounting rules determine when to recognize revenue
amounts. Each invoice line can have different accounting rule.
Oracle Receivables uses the First GL Date field in the Transactions
window to determine when to start recognizing revenue. The number
of periods in which revenue is recognized is determined by the
value in the Number of Accounting Periods field in the Transactions
window.Value defaults from fixed ruleValue must be entered for
variable rule. Accounting distributions are created only after you run
the Revenue Recognition program.
•Accounting distributions are created only after the Revenue
Recognition program is run.
•For Bill in Advance, the offset account to accounts receivable
is Unearned Revenue.
•For Bill in Arrears, the offset account to accounts receivable i
s Unbilled Receivables.
•Accounting distributions are created for all periods when
Revenue Recognition is run.
Revenue Recognition Program Execution Report :
=======================================
Use the Revenue Recognition Execution report to review all
revenue distributions created for invoices that use invoice and
accounting rules.
This report displays the account class, GL Date, Accounting
Flex field, the currency, amount, and accounted amount for
the revenue distributions Revenue Recognition creates for
each transaction.
Receivables automatically creates the Revenue Recognition
Execution report whenever you run the Revenue Recognition
program, the Revenue Recognition Master program, or the
General Ledger Interfaceprogram.
When the Revenue Recognition program encounters transactions
with problems that prevent the creation of distributions, the
program completes with a status of Warning, and Receivables
includes these transactions at the bottom of this report.
•The Revenue Recognition program gives control over the creation
of accounting entries.
•Submit the Revenue Recognition program manually through the
Run Revenue Recognition window.
•The Revenue Recognition program will also be submitted when
posting to Oracle General Ledger.
•The program processes revenue by transaction, rather than by
accounting period.
•Only new transactions are selected each time the process is run.
Automated Revenue Recolonization Tools in the Market:
-RevPro
-RevStream
-Revenue Edge.
==========================================
Vendor Specific Objective Evidence, is Fair Value for Software.
SOP 97-2 was designed for Software companies, and works fairly
well for certain traditional business models.
The concept was introduced in 1997 by the AICPA in their Statement
of Position (SOP) 97-2: It governs how any company that licenses,
sells, leases or otherwise markets software (unless it’s incidental to
the product or service as a whole) must recognize the revenue.
In particular, it governs how companies must recognize revenue from
so-called “multiple-element arrangements” – bundles of software and
related products or services sold as a unit at a single price.
Today, more and more companies find themselves dealing with
VSOE as embedded software becomes an increasingly essential
element in traditionally non-software sectors - consider cell
phones, medical devices, computer networks, even cars with GPS
services, etc.
According to SOP 97-2: you allocate relatively, splitting the fee
amongst the products and related elements based upon VSOE –
which is the price established by the vendor for the separate sale
of each element. Each VSOE price is usually established through
accumulation of a quantity of discrete sales “sufficient” to prove
that the market, in it’s willingness to pay that price, thinks the
price is fair. And here’s the big catch:
You can not recognize revenue for any element either until VSOE
exists for each and every element, or until all of the elements
have been delivered.
Sec's Statement of Postion (SOP) 97-2, Software Revenue
Recognition and SOP 98-9, Software Revenue Recognition with
respect to certain transactions, applied to all entities that license,
sell, lease or market computer software. It specifies that revenue
from an arrangement involving multiple elements should be
allocated to the various elements based on VSOE fair values to
the customer.
Sections of SOP 97-2 were amended with SOP 98-9, Software
Revenue Recognition with respect to certain transactions,
SOP 98-9 states that the residual method of revenue recognition is
required when:
1. There is vendor specfic objective evidence of the fair values of all
undelivered elements in a multiple-element arrangment that is not
accounted for using long-term contract accounting.
2. VSOE of fair value does not exist for one or more of the delivered
elements in the arrangement and 3. All Revenue recognition criteria
in SOP 97-2 other than the requirment for VSOE of the fair value of
each delivered element of the arrangement are satisfied.
Elements of VSOE:
==================
-Software Licenses
- Warranty
- Installation
- Support and professional Services
- Training
Fair Market Value (FMV):
========================
The FASB defined 'fair value' in FAS 159 as "The price that
would be received to sell an asset orpaid to transfer a liability
in an orderly transaction between market participants at the
measurement date. " The key points in this definition are
'orderly transaction' and 'market participants.' Thus fair value
can't be established by looking at an exchange of assets in a
bankruptcy or between 'related parties' as defined by the SEC.
Fair value is established by multiple, non- related market
participants in 'normal, orderly transactions. ' VSOE, on the other
hand, is fair value as established by looking at the historical
transactions of a specific vendor and does not consider what other
vendors are charging for similar products.
Revenue Recognition:
====================
Revenue recognition in today's regulatory and business
environment involves sophisticated revenue scheduling and
allocation, Vendor- specific Objective Evidence (VSOE) carve-outs
and Sarbanes-Oxley compliance. Thus having a common system
for global compliance is key to reducing complexity.
Revenue recognition is a principle prescribing that revenue is
recognized when earned.
It has two considerations - when to recognize revenue, and how
much to recognize. Revenue recognition is relevant for companies
to be able to adhere to legal compliance as per the US GAAP
requirements.
Improper revenue recognition increases the risk of financial
restatement, and financial restatements. Revenue for ISV's is
typically divided into three categories: Software, Maintenance, and
Services. Assuming that software customization is not required,
revenue can be recognized when all of the following criteria are met:
There are four basic criteria that must be met to recognize
revenue
- Evidence
- Delivery
- Fixed or determinable fee
- Collectibility.
Revenue Accounting:
===================
Use the Revenue Accounting feature to quickly and easily adjust
revenue and sales credits at the transaction or line level. You can
make manual adjustments using the Revenue Accounting and
Sales Credits window. Alternatively, use the Revenue Adjustment
API to automatically perform these adjustments. Revenue
Accounting uses the Actions Wizard to guide you through the process
of making and modifying revenue adjustments.
You can also use the wizard to record early acceptance for an
invoice line, if the line is associated with a contract that offers an
acceptance clause.
Invoicing Rules:
===============
Use Invoicing Rules to specify whether to record receivables
amounts in the first (Bill in Advance) or Last (Bill in Arrear)
Period.
Invoicing rules determine when to bill the customer in relation to
the accounting rule Periods. Accounting rules determine the
accounting periods for revenue recognition and Billing.
Two invoicing rules are available:

Bill in Advance: Use this rule to recognize receivables immediately.
Bill in Arrears: Use this rule to recognize the receivable at the end of
the revenue recognition schedule.
•Invoicing rules determine whether to recognize receivables in the first or in the last accounting period.
•Once the invoice is saved, you cannot update an invoicing rule.
•If Bill in Arrears is the invoicing rule, Oracle Receivables updates the GL Date and invoice date of the invoice to the last accounting period for the accounting rule.
Accounting Rules:
=================
Use Accounting Rules to determine when to record revenues.
Accounting Rule determine the number of periods and percentage
of total revenue to record in each accounting period.
Each invoice can have different accounting rule.
Use the Accounting, Fixed Duration type to recognize revenue evenly
over a specific number of periods. Revenue can be spread evenly or a
percentage can be specified for each period.

Variable Duration type to recognize revenue by a percentage for
the first period. The remaining revenue is spread evenly across
the number of periods you specify during transaction entry.
Accounting rules determine when to recognize revenue
amounts. Each invoice line can have different accounting rule.
Oracle Receivables uses the First GL Date field in the Transactions
window to determine when to start recognizing revenue. The number
of periods in which revenue is recognized is determined by the
value in the Number of Accounting Periods field in the Transactions
window.Value defaults from fixed ruleValue must be entered for
variable rule. Accounting distributions are created only after you run
the Revenue Recognition program.
•Accounting distributions are created only after the Revenue
Recognition program is run.
•For Bill in Advance, the offset account to accounts receivable
is Unearned Revenue.
•For Bill in Arrears, the offset account to accounts receivable i
s Unbilled Receivables.
•Accounting distributions are created for all periods when
Revenue Recognition is run.
Revenue Recognition Program Execution Report :
=======================================
Use the Revenue Recognition Execution report to review all
revenue distributions created for invoices that use invoice and
accounting rules.
This report displays the account class, GL Date, Accounting
Flex field, the currency, amount, and accounted amount for
the revenue distributions Revenue Recognition creates for
each transaction.
Receivables automatically creates the Revenue Recognition
Execution report whenever you run the Revenue Recognition
program, the Revenue Recognition Master program, or the
General Ledger Interfaceprogram.
When the Revenue Recognition program encounters transactions
with problems that prevent the creation of distributions, the
program completes with a status of Warning, and Receivables
includes these transactions at the bottom of this report.
•The Revenue Recognition program gives control over the creation
of accounting entries.
•Submit the Revenue Recognition program manually through the
Run Revenue Recognition window.
•The Revenue Recognition program will also be submitted when
posting to Oracle General Ledger.
•The program processes revenue by transaction, rather than by
accounting period.
•Only new transactions are selected each time the process is run.
Automated Revenue Recolonization Tools in the Market:
-RevPro
-RevStream
-Revenue Edge.
Monday, April 20, 2009
Oracle iReceivables
Overview of i Receivables:
Oracle iReceivables is an online invoice presentment, dispute, and payment solution that enables external and internal users to inquire about their accounts and transactions, pay invoices, and dispute invoices via a streamlined credit memo workflow and it helps you reduce the cost of billing and collections while improving overall customer service.
Oracle iReceivables gives the customers self-service access to their accounts with real-time balance and transaction information. T
he Home page gives customers quick access to their account information with drill down capability to specific details. It shows transaction balance and aging information, supports print requests, gives discount alerts, and shows credit memo status
iReceivables Features:
-Customer Search
-Accont Details
-Interactive Invoice
-Payment and Credit memo display
-Dispute a bill
-Credit Memo Workflow
-Automatic Credit memo creation.
-Credit memo Request Confirmation Page
Oracle iReceivables gives your Customers Self-Service Account Management
3. It integrates with Oracle iPayment to enable online payment application and processing.
4. It integrates with Oracle Workflow to provide automated credit memo and multi-print processing.
5. integrates with Bill Presentment Architecture, which provides customizable bill presentment templates.
6. It integrates with Oracle Application Framework to enable personalized display of account information.
Oracle iReceivables is an online invoice presentment, dispute, and payment solution that enables external and internal users to inquire about their accounts and transactions, pay invoices, and dispute invoices via a streamlined credit memo workflow and it helps you reduce the cost of billing and collections while improving overall customer service.
Oracle iReceivables gives the customers self-service access to their accounts with real-time balance and transaction information. T
he Home page gives customers quick access to their account information with drill down capability to specific details. It shows transaction balance and aging information, supports print requests, gives discount alerts, and shows credit memo status
iReceivables Features:
-Customer Search
-Accont Details
-Interactive Invoice
-Payment and Credit memo display
-Dispute a bill
-Credit Memo Workflow
-Automatic Credit memo creation.
-Credit memo Request Confirmation Page
Oracle iReceivables gives your Customers Self-Service Account Management
- Export transaction data to spreadsheet
- Attach documents to transactions
- Manage Payments and Ensure Data Security
- Duplicate dispute warning
- One-time credit card payment
- Configurable service charges
- Customizable transaction search.
- Anonymous user login:
The Anonymous User Login feature allows external customers to log in by only entering an account number. Therefore, customers can access their customer account data without having to register for a username and password. Companies can customize this feature to take the users directly to the page they need to access the most, for example, the Account Details page or the Home page.
The benefits of Anonymous User Login are: 1) it removes the registration overhead for users accessing Oracle iReceivables on the one-time basis. 2)It also speeds up the log-in and navigation process for them. As a result, customers are encouraged to make online payments in a more timely manner. - Multi-pay and multi-print:
-The Multi-Pay feature allows the customers to select multiple invoices and pay all of them at once using credit card or bank account transfer. With this feature, customers no longer have to navigate into each invoice and pay them one by one. Instead, they can just select all the invoices they want to pay in the Account Details page and pay them all at once.
-The Multi-Print feature allows customers to select multiple invoices and print all of them at once. The print format is defined in Oracle Receivables, including PDF, HTML, text, XML, PostScript, etc. Once the print job is completed, the customers will receive an e-mail notification containing a link for accessing the printed documents. The link allows for one-time access only.
Why do companies want to use Oracle iReceivables?
1. To remove their paper invoices and reduce the mailing and faxing overhead for their invoices. 2. To reduce the manual payment applications and receive payments from their customers more quickly. 3. To reduce phone calls and automate their collections and customer services. 4. To be able to resolve bill disputes quickly and improve their customer satisfaction.
Oracle iReceivables supports :
- A paperless enterprises It streamlines the dispute processes to help reduce the DSO (Days Sales Outstanding)
- It provides customers with self-service payment options such as credit card or bank account, and payment scheduling.
- It enables companies to collaborate with their customers through the self-service account management.
- It automates user administration and registration and expedites online access for one-time users.
Oracle iReceivables Modules Intergration:
1. It integrates with Oracle Receivables to provide real-time transaction status and details.
2. It with Oracle Trading Community Architecture to provide real-time account access and customer information.3. It integrates with Oracle iPayment to enable online payment application and processing.
4. It integrates with Oracle Workflow to provide automated credit memo and multi-print processing.
5. integrates with Bill Presentment Architecture, which provides customizable bill presentment templates.
6. It integrates with Oracle Application Framework to enable personalized display of account information.
- Set the Profile option, Currency:Negative Format correctly so that negative numbers have the negative sign not brackets to facilitate exporting to Microsoft Excel.
- Set the profile option FND:View Object Max Fetch Size, so that all transactions can be viewed on a single page rather than scrolling pages.
- setup of External users is done by the party number assigned to a contact.
- Provides anytime, anywhere access to the application via a web enabled mobile device
Designed specifically for mobile devices - For internal (Management , Collection Agents and sales reps) and external users (customers)
- Access for internal and external users can be restricted based on configurable function security Integrated with Mobile Customer Directory
Mobile Accounts provides the following information about a customer :
–Account Overview
–Credit Information
–Recent Activity
–Aging
Features:
–Robust Customer Search using Mobile Customer Directory
–Powerful Transaction Search
–Ability to drill down to the Transaction Detail
–Pay an invoice
–Configurable access control
–Efficient non-hierarchical navigational menus
setups:
1. Defind iReceivables Internal Users2
. Defind iReceivables External users and customer Access
3. Define Function Security
4. Index the Customer Database
5. Set up for Self Registraion
6. Setup for Anonymous user login
7. Define Service Charges
8. Review and update Receivables lookups
9. Set the proifle option fo agining buckets
10.Define currencies for customers and customer bill to sites.
11. Define Receipt Class and Payment methodl
12. Set receivables system option for ireceivables payments.
13. setup document sequencing for ireceivables receipts.
14. Set Profile option for ACH Bank accoun transfer payments
15. Modify the dispaly of account information
16. Set profile option for bill presentment architecuture.
17. intergra ireceivables into your business processes.
for more information pls go through the implementation guide and user guide.
Monday, March 16, 2009
Auto Invoice in Accounts Receivables:
What is Autoinvoice?
Autoinvoice is a powerful and flexible tool, used to import and validate transaction data from external financial systems or other modules of Oracle Applications. Users can create Invoices, debit memos, credit memos, and on-account credits in Oracle Receivables using Autoinvoice.
Auto invoice Process:
Data for creating invoices comes in from various sources such as external systems, Order Management, Oracle Projects, Oracle Services and so on. The interface loading program is run to populate the interface tables. When the Autoinvoice Master Program and Import Program are run, the data passes through certain validation processes and finally populates the tables of the Oracle Receivables module.
The feeder program populates data into the Autoinvoice interface tables, namely
RA_INTERFACE_LINES_ALL,
RA_INTERFACE_DISTRIBUTIONS_ALL and
RA_INTERFACE_SALESCREDITS_ALL
Every line must use the RA_INTERFACE_LINES_ALL table. The other two tables are optional.
RA_INTERFACE_LINES_ALL Table:
This table contains information related to all transactions to be processed by AutoInvoice. Transactions include invoices, debit memos, credit memos, and on-account credits. This table holds the key data such as bill-to customer, ship-to customer, and transaction date.
• Each record contains line, tax, freight, or finance charges information.
• The Line Type field identifies the type of information contained in the record.
• A record can be a parent record: Line, Header Freight, or Charges; or a child record: Tax or line-level Freight.
• A child record is linked to the parent record using the Link-To Transaction flex field.
RA_INTERFACE_DISTRIBUTIONS_ALL Table:
Oracle Order Management does not use this table because Auto Accounting creates the distributions in Oracle Receivables.
This table contains accounting distributions to be used by the transactions defined in RA_INTERFACE_LINES_ALL.
• Accounts defined in this table override any accounts created using Auto Accounting.
• You can choose to pass some or all account information to AutoInvoice. Any accounts that are not passed will be derived using Auto Accounting.
• Records in this table are linked to records in the RA_INTERFACE_LINES_ALL table using the Transaction flex field.
RA_INTERFACE_SALESCREDITS_ALL Table:
This table contains all sales credit information for the transactions in the
RA_INTERFACE_LINES_ALL table.
• The two tables are linked using the Transaction flex field.
• This table is required to track sales credits.
When the Autoinvoice program is run, data is populated into the tables listed below
-RA_BATCHES_ALL
-RA_CUSTOMER_TRX_ALL
-RA_CUSTOMER_TRX_LINES_ALL
-RA_CUST_TRX_LINE-GL_DIST_ALL
-RA_CUST_TRX_LINE_SALESREPS_ALL
-AR_RECEIVABLE_APPLICATIONS_ALL
-AR_PAYMENT_SCHEDULES_ALL
-AR_PAYMENT_SCHEDULES_ALL
-RA_INTERFACE_ERRORS_ALL
Grouping Rules:
Autoinvoice uses grouping rules to group lines to create one transaction. Mandatory grouping attributes cannot be dropped. However, users can add optional grouping attributes.
The grouping rule ‘DEFAULT’ is a seeded value, which contains all the mandatory grouping attributes.
Grouping rules are mandatory and determine how transaction lines are grouped into transactions Optionally, you can use line ordering rules to determine the order in which lines are displayed on a transaction.
To uniquely identify imported transactions and link the tax, freight, commitments, and credit memos, define the Transaction flex fields.
AutoInvoice validates your data by ensuring that the columns in Receivables Interface Tables reference the appropriate values and columns in Receivables.
Autoinvoice uses the following hierarchy to determine the grouping rule that is to be used:
· Transaction batch source
· Customer site level
· Customer profile level
· System Options Window
If a grouping rule is not specified, either, at the Transaction Source or at the Customer Site level or in the Customer Profile Classes window, Autoinvoice uses the default grouping rule specified in the System Options.


The errors in the interface tables can be corrected with the help of the AutoInvoice Validation Report and the AutoInvoice Errors window which displays records that failed AutoInvoice validation. Depending on the error you may need to make changes either in Receivables, or to your feeder program or to the imported records in the interface tables.
Menu: Interfaces>Control>AutoInvoice>Interface Lines
Interface Lines Window - This window lets you see all of the interface lines that have been processed but rejected by AutoInvoice. You can view and edit data in this window.
Menu: Interfaces>Control>AutoInvoice>Interface Exceptions
Interface Errors Window - This window lets you see all of the errors generated by AutoInvoice. This window is read-only, but you can drill down to view errors in more detail, and modify data in these windows
Within the table RA_INTERFACE_LINES_ALL, there is a column called INTERFACE_LINE_ID. When the Autoinvoice process runs, this column is populated with a unique sequence value. If the process errors, the INTERFACE_LINE_ID can be referenced in the RA_INTERFACE_ERRORS_ALL table. This table will also include the error message for the particular order line in the main interface table.
Error: The total amount of your credit memo cannot exceed the balance of the debit item it is crediting.
Autoinvoice is a powerful and flexible tool, used to import and validate transaction data from external financial systems or other modules of Oracle Applications. Users can create Invoices, debit memos, credit memos, and on-account credits in Oracle Receivables using Autoinvoice.
Auto invoice Process:
Data for creating invoices comes in from various sources such as external systems, Order Management, Oracle Projects, Oracle Services and so on. The interface loading program is run to populate the interface tables. When the Autoinvoice Master Program and Import Program are run, the data passes through certain validation processes and finally populates the tables of the Oracle Receivables module.
The feeder program populates data into the Autoinvoice interface tables, namely
RA_INTERFACE_LINES_ALL,
RA_INTERFACE_DISTRIBUTIONS_ALL and
RA_INTERFACE_SALESCREDITS_ALL
Every line must use the RA_INTERFACE_LINES_ALL table. The other two tables are optional.
RA_INTERFACE_LINES_ALL Table:
This table contains information related to all transactions to be processed by AutoInvoice. Transactions include invoices, debit memos, credit memos, and on-account credits. This table holds the key data such as bill-to customer, ship-to customer, and transaction date.
• Each record contains line, tax, freight, or finance charges information.
• The Line Type field identifies the type of information contained in the record.
• A record can be a parent record: Line, Header Freight, or Charges; or a child record: Tax or line-level Freight.
• A child record is linked to the parent record using the Link-To Transaction flex field.
RA_INTERFACE_DISTRIBUTIONS_ALL Table:
Oracle Order Management does not use this table because Auto Accounting creates the distributions in Oracle Receivables.
This table contains accounting distributions to be used by the transactions defined in RA_INTERFACE_LINES_ALL.
• Accounts defined in this table override any accounts created using Auto Accounting.
• You can choose to pass some or all account information to AutoInvoice. Any accounts that are not passed will be derived using Auto Accounting.
• Records in this table are linked to records in the RA_INTERFACE_LINES_ALL table using the Transaction flex field.
RA_INTERFACE_SALESCREDITS_ALL Table:
This table contains all sales credit information for the transactions in the
RA_INTERFACE_LINES_ALL table.
• The two tables are linked using the Transaction flex field.
• This table is required to track sales credits.
When the Autoinvoice program is run, data is populated into the tables listed below
-RA_BATCHES_ALL
-RA_CUSTOMER_TRX_ALL
-RA_CUSTOMER_TRX_LINES_ALL
-RA_CUST_TRX_LINE-GL_DIST_ALL
-RA_CUST_TRX_LINE_SALESREPS_ALL
-AR_RECEIVABLE_APPLICATIONS_ALL
-AR_PAYMENT_SCHEDULES_ALL
-AR_PAYMENT_SCHEDULES_ALL
-RA_INTERFACE_ERRORS_ALL
Grouping Rules:
Autoinvoice uses grouping rules to group lines to create one transaction. Mandatory grouping attributes cannot be dropped. However, users can add optional grouping attributes.
The grouping rule ‘DEFAULT’ is a seeded value, which contains all the mandatory grouping attributes.
Grouping rules are mandatory and determine how transaction lines are grouped into transactions Optionally, you can use line ordering rules to determine the order in which lines are displayed on a transaction.
To uniquely identify imported transactions and link the tax, freight, commitments, and credit memos, define the Transaction flex fields.
AutoInvoice validates your data by ensuring that the columns in Receivables Interface Tables reference the appropriate values and columns in Receivables.
Autoinvoice uses the following hierarchy to determine the grouping rule that is to be used:
· Transaction batch source
· Customer site level
· Customer profile level
· System Options Window
If a grouping rule is not specified, either, at the Transaction Source or at the Customer Site level or in the Customer Profile Classes window, Autoinvoice uses the default grouping rule specified in the System Options.


Transaction Flex fields:
Transaction flex fields are descriptive flex fields that AutoInvoice uses to uniquely identify transaction lines.
Because they are unique for each transaction line, they can also be used to reference and link to other lines.
Receivables lets you determine how you want to build your transaction flex field structure and what information you want to capture.
Define a flex field for each import source. Specify which one to use during import.
Use the Reference Flex field to link a credit memo line to a transaction. This passes information like order number, project number, and shipping information.
There are four types of transaction flex fields are
· Line Transaction Flex field
· Reference Transaction Flex field
· Link-to Transaction Flex field
· Invoice Transaction Flex field
Line Transaction Flex Field: Use columns INTERFACE_LINE_ATTRIBUTE1-15 and INTERFACE_LINE_CONTEXT to define the Line Transaction Flex field. They are unique for each record in the interface tables and therefore can be used as record identifiers.
The INTERFACE_LINE_CONTEXT field in RA_INTERFACE_LINES_ALL indicates to Autoinvoice, the Line Transaction Flex field code that is to be used. The Context value corresponds to the code field. For example Order Entry, Intercompany etc.
The Line Transaction Flexfield must be defined mandatorily. Autoinvoice always uses the Line Transaction Flexfield structure for both, the Link-to and Reference information when importing invoices. You need to explicitly define the Link-to, Reference and Invoice Transaction Flexfield structures, only if this information is to be displayed on a custom window.
Source: ORDER MANAGEMENT the line transaction flex filed code is ORDER ENTRY.

Reference Transaction Flexfield:
Reference Transaction Flexfields have the same structure as the Line Transaction Flexfields. Reference Transaction Flexfields are used to refer to previously processed transactions.
For example, to import a credit memo and apply it to an invoice or associate an invoice to a specific commitment, use the Reference Transaction Flexfield.
To refer a credit memo to a specific invoice use the REFERENCE_LINE_ATTRIBUTE1-15 and REFERENCE_LINE_CONTEXT columns of the credit memo to enter the value of the Line Transaction Flexfield of the invoice. If the invoice being credited, is already in AR, populate the REFERENCE_LINE_ID column of the table RA_INTERFACE_LINES_ALL.
Link-to Transaction Flexfield:
Link-to transaction flexfields also have the same structure as the Line Transaction flexfield. Use Link-to transaction flexfields to link transaction lines, to each other. For example, to import a freight charge that is associated with a particular transaction line, use the LINK_TO_LINE_ATTRIBUTE1-15 and LINK_TO_LINE_CONTEXT columns of the freight line and populate the value of the Line Transaction Flexfield of the particular transaction line.
Invoice Transaction Flexfield:
Invoice Transaction Flexfield has a structure similar to that of the Line Transaction Flexfield, but includes only the header level segments. Segments included in the Invoice Transaction Flexfield should be included in the Autoinvoice grouping rules. To define the header level transaction flexfield, query Invoice Transaction Flexfield in the title field of the descriptive flexfield segments window and enter the context and segments associated with this transaction flexfield.
All segments in the Line Level transaction Flexfield that refer to the header information must also exist in the header level transaction flexfield.
Auto invoice Validation:
AutoInvoice Validation Validates lines for:
-Accounting Rules
-Accounting Periods.
AutoInvoice validates the data for compatibility with Receivables. It ensures that the columns in Receivables’ interface tables reference the appropriate values and columns in Recievables. It checks for:
Existence: Ensures that the values for some columns are already defined.
Batch Sources: Ensures consistent values for fields in the Transaction Sources window.
Uniqueness: Ensures that the invoice number you supply is unique within a given batch source.
Precision: Ensures that the amount and accounted amount have the correct precision.
Cross Validation: Ensures that column values agree with each other.
Autoinvoice Master Program:
Autoinvoice Master Program selects and marks records in the interface tables, for processing based on the parameters entered. Once the records are selected, the Autoinvoice Import Program is spawned. Autoinvoice Master Program does not provide any report or output. The Master program allows running of several instances of Autoinvoice to improve system performance and to facilitate importing of transactions quickly.
The AutoInvoice Master Program can be submitted from the Standard Report Submission (SRS) window. This process can be schedule to run on specific intervals using the SRS scheduling features. Process specific transactions or a range of transactions by entering report parameters as listed on the slide above.
Use different selection criteria to submit individual transactions or groups of transactions.
Submit a maximum of fifteen instances.
Autoinvoice Import Program:
Autoinvoice Import Program validates the selected records and creates transactions. Any record that fails validation is left in the interface table with an error code. Depending on the overall setup, related records may be rejected as well. An output files called Autoinvoice Execution Report and Validation Report, can be viewed by clicking the View Report button in the Requests Window.
Autoinvoice Purge Program:
Autoinvoice Purge Program deletes records from the interface tables. Only records that have been successfully processed by Autoinvoice are purged. If the Purge Interface Table option in the System Options window is set to No, Autoinvoice does not delete processed records from the interface tables after each run and the Autoinvoice Purge Program will have to be submitted independently.
Reports:
The Autoinvoice Master Program log file, gives details of the concurrent request initiated by the Autoinvoice Master Program and any errors encountered therein.
The Autoinvoice Import Program log file, gives details of the concurrent request carried out for the import of transaction and any errors encountered therein.
The Autoinvoice Execution Report lists the total number of transaction, sales credit and distribution, lines that was successfully imported as well as those that failed.
The Autoinvoice Validation Report is created if any records have failed different phases of validation. It displays all error messages associated with each transaction, sales credit or distribution line that failed validation.
Correcting Auto invoice Errors Overview:
The AutoInvoice Exception Handling Windows can be used to correct errors that are in the AutoInvoice Interface Table. Records that pass validation are transferred into Receivables transaction tables. Records that fail validation are called exceptions; these records remain in the AutoInvoice interface tables.
Once you have corrected the errors, you must resubmit AutoInvoice. Valid lines cannot be changed in the AutoInvoice Exception Handling windows. Only those lines with errors can be changed
Interface Exceptions Window:
Displays the interface ID, exception type, error message, and the invalid value associated with each error. Cannot edit data in this window, but you can view the error message and easily correct the error by clicking the Details button.
Note: The error message and column name with erroneous data is displayed in the Message column, and the value that needs to be corrected is displayed in the Invalid Value column.
Interface Lines Window:
Displays all records in the interface tables that failed validation, provides an error message, and can be used to correct invalid records.
Click the Details button, the window opens where the errors can be corrected. Buttons are provided to correct specific types of errors.
Correct errors in these windows.
Line Errors Window:
Displays all errors associated with a specific line and can only be opened from the Interface Lines window. View all errors associated with a single line by clicking the Errors button in the Interface Lines window. Cannot edit data in this window. Displays the interface ID, the error type, error message, and the invalid value.
Note: You might use this window when you access the Interface Lines window directly, which does not display the error messages. The type indicates which button to click in the Interface Lines window.
How is the Tax code derived in AutoInvoice:
AutoInvoice first looks at the transaction type setup (Menu: Setup>Transactions>Transaction Types) and the TAX_EXEMPT_FLAG column in RA_INTERFACE_LINES_ALL. If the 'Calculate Tax' box is checked on the transaction type OR the TAX_EXEMPT_FLAG column is 'R'(for Required), it tries to derive the Tax code.
To get the tax code, AutoInvoice looks at the following places in the following order, stopping at the first place where it finds a tax code.
-Ship to site; -Bill-to-site; -Customer; -item
Useful Queries:
==============================
select
*
from
AR_VAT_TAX_ALL_B (VAT Code id);
===============================
Select
*
from
AR_VAT_TAX_ALL_B
Where
set_of_books_id=1002;
==============================
select
set_of_books_id,
tax_code,
tax_rate,
tax_type,
start_date,
org_id
from
ar_vat_tax_all
where
vat_tax_id = 10007;
=================================
Correcting AR Interface Errors:
The errors in the interface tables can be corrected with the help of the AutoInvoice Validation Report and the AutoInvoice Errors window which displays records that failed AutoInvoice validation. Depending on the error you may need to make changes either in Receivables, or to your feeder program or to the imported records in the interface tables.
Menu: Interfaces>Control>AutoInvoice>Interface Lines
Interface Lines Window - This window lets you see all of the interface lines that have been processed but rejected by AutoInvoice. You can view and edit data in this window.
Menu: Interfaces>Control>AutoInvoice>Interface Exceptions
Interface Errors Window - This window lets you see all of the errors generated by AutoInvoice. This window is read-only, but you can drill down to view errors in more detail, and modify data in these windows
Within the table RA_INTERFACE_LINES_ALL, there is a column called INTERFACE_LINE_ID. When the Autoinvoice process runs, this column is populated with a unique sequence value. If the process errors, the INTERFACE_LINE_ID can be referenced in the RA_INTERFACE_ERRORS_ALL table. This table will also include the error message for the particular order line in the main interface table.
Error: The total amount of your credit memo cannot exceed the balance of the debit item it is crediting.
Option1:
In the interface table , keep the curose after sale order field and click show field to check for the reference_line_id and make that field as null and resubmit the autoinvoice.
Option2:
update ra_interface_lines_all
set reference_line_id = null
where sales_order = :errored_sales_order
and reference_line_id is not null;
Error: You cannot apply a transaction with a negative amount to another transaction with a negative balance and vice versa.
Option1:
In the interface table , keep the curose after sale order field and click show field to check for the reference_line_id and make that field as null and resubmit the autoinvoice.
Option2:
update ra_interface_lines_allset reference_line_id = nullwhere sales_order = :errored_sales_orderand reference_line_id is not null;
Error: You can supply at most one Receivables account for a transaction (an invoice, a debit memo or a credit memo)
This error is caused by violating the mandatory grouping rules as defined by seeded Oracle functionality. This can occur on any number of fields so the key would be to review the following fields to ensure they are match per sales order:
AGREEMENT_ID
COMMENTS
CONS_BILLING_NUMBER
CONVERSION_DATE
CONVERSION_RATE
CONVERSION_TYPE
CREDIT_METHOD_FOR_ACCT_RULE
CREDIT_METHOD_FOR_INSTALLMENTS
CURRENCY_CODE
CUSTOMER_BANK_ACCOUNT_ID
CUST_TRX_TYPE_ID
DOCUMENT_NUMBER
DOCUMENT_NUMBER_SEQUENCE_ID
GL_DATE
HEADER_ATTRIBUTE1-15
HEADER_ATTRIBUTE_CATEGORY
HEADER_GDF_ATTRIBUTE1-15
INITIAL_CUSTOMER_TRX_ID
INTERNAL_NOTES
INVOICING_RULE_ID
ORIG_SYSTEM_BILL_ADDRESS_ID
ORIG_SYSTEM_BILL_CONTACT_ID
ORIG_SYSTEM_BILL_CUSTOMER_ID
ORIG_SYSTEM_SHIP_ADDRESS_ID
ORIG_SYSTEM_SHIP_CONTACT_ID
ORIG_SYSTEM_SHIP_CUSTOMER_ID
ORIG_SYSTEM_SOLD_CUSTOMER_ID
ORIG_SYSTEM_BATCH_NAME
PAYMENT_SERVER_ORDER_ID
PAYMENT_SET_ID
PREVIOUS_CUSTOMER_TRX_ID
PRIMARY_SALESREP_ID
PRINTING_OPTION
PURCHASE_ORDER
PURCHASE_ORDER_DATE
PURCHASE_ORDER_REVISION
REASON_CODE
RECEIPT_METHOD_ID
RELATED_CUSTOMER_TRX_ID
SET_OF_BOOKS_ID
TERM_ID
TERRITORY_ID
TRX_DATE
TRX_NUMBER
This is a difficult error to resolve, but involves reveiwing the interface line attributes.
Error: You can not apply more than the original line amount
Option1: Control > Autoinvoice > Interface Lines
Query for the Order which has the above error message, go to folder and query for Reference Line ID, Delete this reference id.
Option2: update ra_interface_lines_all
set reference_line_id = null
where sales_order = :errored_sales_order
and reference_line_id is not null
Error: Unable to locate a valid sales tax rate for transaction
This error occurs when the Oracle Tax engine or Tax Extension (for third party tax programs) fails to fetch a sales tax code or rate for the destination location, or fails to derive a tax code from the defaults defined through the system options.
The common causes of this error are listed below.
- Missing or incorrect tax rate for the sales tax location combination.
- Obsolete or unmaintained applications, tax engine or tax vendor code.
- The invoice or order transaction date is not within the tax code effective dates.
- When using third party tax vendors, may have overlapping zip code ranges when sales tax data was uploaded.
- A tax code is assigned (customer, site or item) but system option tax defaults are not enabled.
- Location based tax could not be found because transaction country <> home country.
- Addresses are incorrect or not created properly due to invalid database triggers.
- Sales tax location flexfield may be invalid
Error:Please correct revenue account or Receivables account or freight or tax account assignment
Change the revenue account assignment to a valid revenue account assignment.
Autoaccounting is used to determine the accounts when the distribution table is not populated. When AutoInvoice gives this error, it generally gives the account with the missing segment(s).
Review the setups:
Menu: Setup>Transactions>Autoaccounting Query the account mentioned in the above error and note the setup for that missing segment. If it is based on:
- Transaction Type : - Menu: Setup>Transaction>Transaction Types, and verify that all accounts are populated.
- Salesperson - Menu: Setup>Transactions>Salespersons, and verify that all accounts are populated.
- Standard Lines For an Inventory Item navigate to Menu: Setup>Transactions>Items>Inventory items, and verify that the 'Sales Account' is populated in the 'Invoicing' alternate region. For a Memo Line, navigate to Setup =>Transactions =>Memo Lines, and make sure that 'Revenue Account' is populated.
-Taxes Menu: Setup>Tax>Codes and verify that account is populated in 'Tax' column under the 'Accounting' alternate region.
Additionally the following can be checked: Setup of Cross Validation Rules. Run Cross validation Listing Report in GL to identify the cross validation rule stopping the import of this line.
Unable to Derive A GL Date for One Transaction.
Populate GL_DATE with a date or populate the date with the created date in the interface table that falls in an open period.
Useful Queries :
=========================
Select
distinct
interface_line_attribute1,
purchase_order
from ra_interface_lines_all
order by Purchase_order;
=========================
select count(1),
message_text
from ra_interface_errors_all
group by message_text;
========================
SELECT
*
FROM
RA_INTERFACE_ERRORS_ALL
WHERE
interface_line_id
IN
(
SELECT
interface_line_id
FROM
RA_INTERFACE_LINES
WHERE
interface_line_attribute1 = <> );
===================================
Select
interface_line_id,
message_text
from
ra_interface_errors_all
where
message_text
like '%Invalid Warehouse ID%';
===========================
Subscribe to:
Posts (Atom)